Vegetable Cheese Burst Pizza

I am pizza fan for quite a long time now but am very fuzzy about the toppings. Also I like it to be a cheese overload with cheese oozing out from all sides. However most pizza specializing outlets sell pizzas in larger sizes which happen too much for th two of us – my hubby and me.

So we had been avoiding visits to pizza shops. But that’s not a solution. I just wanted to have a cheese burst pizza dominos style so decided to try it out myself at home. The attempt was a success and we both enjoyed the pizza.


Recipe :

Ingredients:

  • 1 cup pizza sauce
  • 1 pound frozen pizza dough
  • 1 small tub cheese spread (8 oz)
  • 1 cup shredded mozzarella cheese
  • 1/2 cup sliced onion
  • 1/2 cup green, yellow, red, orange bell peppers, julienned
  • 2-3 button mushrooms, sliced
  • Zip lock bag

You can include more variety of veggies like olives, jalapeños, etc

Method :

  1. Roll the dough into a log and divide into two equal parts. One part makes one medium-sized pizza.
  2. Take one half and divide it in such way that one is slightly bigger than other (like 2/3 and 1/3).
  3. Grease baking tray with oil and pre-heat oven to 350F.
  4. Take the bigger dough piece and roll it into a thin disc. Place this on the greased tray and keep it covered for 10 mins.
  5. Roll the other piece into a thin disc as well. Roast this very lightly on a tawa. 
  6. Put half the cheese spread in a ziplock bag or piping bag and cut the tip.
  7. Pipe out the cheese spread on the roasted disc leaving the edges. Spread if required.
  8. Invert this on the other disc that was kept covered such that the cheese applied side faces the other disc and is at the center.
  9. Now pipe out the a cheese border along the edge of the roasted disc.
  10.  Then use the edge of the larger uncooked disc to cover and seal the piped out cheese.
  11. Apply around half a cup of the pizza sauce on the prepared pizza base.
  12. Next as per your liking put the cheese or veggies first. I put 1/4 of the shredded cheese.
  13. Then sprinkled the veggies and over which spread another 1/4 cup of shredded cheese.
  14. Bake the pizza in the preheated oven for 10-15 min.


Classic rum cake 

We were at a get together at our relative’s place. While talking about cuisines and various dishes, suddenly all were nostalgic about a rum cake which our aunt Usha Naik (family friend)  had baked and relished by all for some party in the past. As we had recently moved here, we were not obliged to relish it ☹️.

However, I was very eager to get hold of the recipe and try it out. Christmas was around the corner and I was planning to try it out then. So I grabbed the recipe from aunt Usha and was all ready with the ingredients in my pantry. But to my dismay my hubby was in no mood for any more cakes that month as be already had consumed our wedding anniversary cake by mid December.

I was just waiting for an occasion to seek an opportunity to bake it. Recently was my paternal grand dad’s 100th birthday remembrance. So I didn’t wait at all and just decided to try it out no matter what. My grand dad too was a foodie even at his old age. Though he was a doctor himself and health conscious, he did not give up on relishing delicious food.

Thanks Usha aunty for the recipe. We and many of our friends enjoyed the yummy cake. Let’s begin with the recipe. I have done very minor changes to the original.


Recipe :

Ingredients:

For the cake –

  • 1/2 cup chopped walnuts
  • 1 box yellow cake mix (The recipe asked to use 18 1/2 oz box however I used the gluten free pack by Pillsbury 17 oz. You can use the regular packs of traditional yellow cake mix of 15.25 oz which would work well)
  • 1 box instant pudding and pie filling (3.4 oz)
  • 4 eggs
  • 1/2 cup cold water
  • 1/2 cup vegetable oil
  • 1/2 cup rum

For the rum glaze –

  • 1/2 cup butter ( 1 stick or 1/4 pound)
  • 1 cup granulated sugar
  • 1/4 cup water
  • 1/2 cup rum

Method :

  1. Preheat the oven to 325 F.
  2. Grease and flour a 10 inch tube pan or 12 cup bundt pan.
  3. Sprinkle about 1/4 cup or less walnuts at the bottom of the pan.
  4. Mix all the rest ingredients and then fold in the remaining walnuts.
  5. Pour the mix into the greased pan and bake in the preheated oven for an hour or till cake doneness.
  6. Remove the cake and allow it to cool completely on a cooling rack.
  7. For the glaze, melt the butter in a saucepan.
  8. Stir in the sugar and water and continue stirring till sugar dissolves.
  9. Allow to boil for 5 mins and then remove from heat.
  10. Stir in the rum.
  11. Drizzle and smooth the glaze over the top and sides of the cake.
  12. Allow the cake to absorb the glaze completely and then repeat till the entire glaze is used up.

Banana Loaf

This recipe is passed on to me by my mum. It’s nothing but sooji halwa or semolina dessert in cake or loaf form. I have always relished this since my childhood. So would like to share it with you.


Recipe :

Ingredients :

  • 2 – 3 medium-sized bananas
  • 1 tbsp ghee/ clarified butter
  • 1 cup semolina (sooji)
  • 3/4 cup granulated sugar
  • 3/4 cup milk
  • 1/4 tsp cardamom powder
  • 1/4 tsp baking powder
  • salt as per taste

Method :

  1. Heat ghee in a pan. Once hot, roast the semolina till slightly roasted but take care it doesn’t turn brown.
  2. In a mixie, mash banana with sugar.
  3. Once the semolina is cooled, add the mashed banana sugar mix into the roasted semolina.
  4. Try to remove the left over banana mix from blender blending the milk. Then add this milk into the semolina.
  5. Now add the cardamom powder, baking powder and salt and mix well.
  6. Grease a loaf pan and pour the contents into it.
  7. Bake this in an oven preheated at 350 F for around 25-30 mins or till a skewer inserted in the center comes out clean.
  8. Enjoy the cake for dessert or snack time.

Cheese Stuffed Garlic Bread

Cheese stuffed garlic bread has been our favorite even back in India. Now that I have my new kitchen gadget the stand mixer, bread recipes or baking is always on my mind.

Taking garlic bread recipe shared by hebber’s kitchen as the base and alternating or adjusting few ingredients readily available at home instead of the one’s mentioned, this happens to my tried, tested and relished version. Yum yum


Recipe :

Ingredients :

Dough :

  • 1/3 cup warm milk
  • 1 tsp yeast
  • 1 tsp sugar
  • 1/4 tsp salt
  • 1 cup all-purpose flour
  • 1 tbsp butter
  • 1 tsp garlic powder
  • 3/4 tsp mixed herbs
  • oil for coating

Garlic butter :

  • 2 tbsp butter, melted
  • 1 tsp garlic powder
  • 1 tbsp coriander leaves, chopped
  • 1 tsp mixed herbs
  • 1 tsp red chili flakes

Other ingredients :

  • 1/3 cup mozzarella cheese,shredded
  • flour for dusting and rolling

Method :

  1. Mix the yeast salt and sugar in warm milk and allow it to stand for 5 mins or till frothy.
  2. In the flour, add garlic powder, mixed herbs, butter and the frothy yeast mixture and knead into a soft dough.
  3. Coat with oil and allow the dough to rest for 2 hours. Keep the dough bowl covered with damp cloth. The dough will double up.
  4. Mix together all the ingredients of garlic butter.
  5. Dust the countertop with flour and punch the dough for 5 mins.
  6. Spread or roll out the dough into a thick circular disk.
  7. Apply a layer of garlic butter on the dough using a brush.
  8. Then sprinkle the cheese on half the side and cover the cheese with remaining half of dough making a semi-circle or fold into half.
  9. Properly seal the edges.
  10. Brush the remaining butter on the top.
  11. Using a knife give slight cuts on the bread so that once it bakes you get slices formation.
  12. Bake for 15 mins or till slight brown in an oven preheated at 350 F.

Bread buns / Dinner rolls

I had tried to bake bread long time bake which did not turn out that good. After that though I had a willingness to bake bread, I didn’t dare to as it was a tedious job involving lots of muscle power for kneading and proofing time.

Mid November approached and the deals for Black Friday started coming up. An eye catcher deal for me under kitchen section was the Kitchenaid Stand Mixer. I was like in two minds however the deal was awesome. I was almost getting it at half the actual price.
Finally I bought it. Now I was eager to try something utilizing it. Finally yesterday I decided to try out bread again. I referred a multiple recipes and then mixing all, followed the one below which yields 12 buns or rolls.


Recipe :

Ingredients:

  • 4 cups sifted all purpose flour
  • 3 packets active dry yeast or around 2 tbsp
  • 1 tsp salt
  • 1 tbsp granulated sugar
  • 1/2 cup warm water
  • 1/4 cup milk
  • 2 tbsp butter
  • Butter & milk for brushing

Method:

  1. Add salt, sugar and yeast to warm water, mix and allow it to stand for 10 mins or till it turns frothy.
  2. In a mixing bowl, mix the flour, butter and water. In case you using a stand mixer, use the dough hook and run the stir mode for a minute for mixing.
  3. Knead into a soft dough by adding the yeast mixture only as much required to form the dough. I required somewhere between 1/3 -1/2 cup. If using stand mixer, run the mixture on medium speed till the dough is formed which takes around 5-10 mins.
  4. Dust bowl with plain flour and allow the dough to stand in it for an hour covered with a damp cloth. This is proofing.
  5. After an hour you will notice that the dough has doubled up in size. Punch this for 2 mins using greased palms.
  6. Divide this dough into 12 round smooth balls. Place them in a greased tray allowing a half inch space between them. I made 8 of them into round balls and remaining four I rolled each into a strand and turned them into a knotted 8 shape to bake it into a dinner roll.6b85528b-25c5-4320-9e07-4d946d66d4f1
  7. Again allow them to stand covered for half an hour. They will again double up.
  8. Preheat oven to 350F. Brush each roll with milk. You can even use egg wash instead of milk.
  9. Bake for 45 mins or till the acquire slight brown color.
  10. Remove them and brush again with butter to give a shiny appearance.
  11. Enjoy the rolls with butter for breakfast or can we had with a spicy curry for the meals.

Ribbon Cake

Cakes have always been one of my favorite desserts or snack and being passionate about baking I always like to experiment with a variety of baked goodies.

As a child I always waited for the Christmas season to arrive or looked forward towards an invite at a Christian family’s home for a birthday party,etc. I know it sounds insane. But kids are kids, innocent at heart.

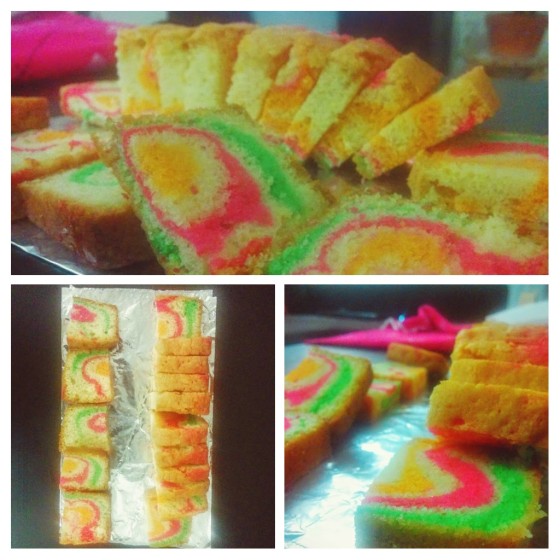
As a child I always had this fascination towards the ribbon cake. At that time, the exact type or name of the cake was so immaterial to me. Rather I would always describe the cake to my parents or the shopkeeper to get what I desired. I would just say a “cake whose slice has pink or green or both color bands on it.”As a college girl too, I remember I used to buy the ribbon cake, quarter kg from the Apollo bakery in Ponda.

A few days back Ms.Xanti Pinto posted ribbon cake pictures on a food group (Base Recipe by Xanti). I was so damn delighted to see those. It was also my mum’s birthday that day. So I thought I should be seeking the recipe from her as soon as possible and baking one at once so that though seven seas away from mum can celebrate her birthday as well re-live my childhood. However I could not get the recipe in time.

But as Children’s Day (14 November is celebrated as Children’s day in India – my home country) was round the corner, what better day than this one to re-live my childhood. So taking Xanti’s recipe as base and making a few modifications to it, here we go ahead to bake the Ribbon cake.

img-20161113-wa0003

Recipe :

Ingredients :

  • 1 cup all-purpose flour
  • 1 tsp baking powder
  • pinch of salt
  • 1 stick unsalted butter, at room temperature, cut into cubes
  • 3/4 cup granulated sugar (you can adjust the sugar based on the sweetness you prefer)
  • 2 large eggs, at room temperature
  • 1 tsp vanilla extract
  • 9 inch loaf pan
  • gel or tube colors (pink, green and orange)

Note : Incase you are using salted butter, please omit using the salt

Method :

  1. Pre-heat the oven to 320 F.
  2. Grease a 9 inch loaf pan and line it with parchment paper.
  3. In a bowl, sift the all-purpose flour, salt and baking powder.
  4. In a mixing bowl, beat the butter and sugar  till light and fluffy using a hand mixer.
  5. Add one egg at a time and beat the batter further.
  6. Add the vanilla extract and mix well.
  7. Now fold in the flour mixture into the wet ingredients until well incorporated and a smooth lump-free batter is achieved.
  8. Take 3 bowls and spoon a tbsp of the batter in each of these bowls and retain the rest.
  9. In each bowl mix each of the gel colors. so now you have vanilla batter, a little of orange, pink and green batter
  10. Spread a smooth layer of vanilla batter at the base of the loaf pan.
  11. On top of this, pour one of the colored batter. Smooth this out like a color band, however you need not spread it as a layer.(It also wont be sufficient to spread as a layer).
  12. Repeat till rest of the colored and vanilla batters are consumed, alternating each. Remember that you have to spread only the vanilla batter as a layer.
  13. Finally smooth out the surface and tap the pan against the counter top to get rid of any air bubbles.
  14. Bake the loaf for 45-60mins or till a toothpick inserted in the center of the cake comes out clean.
  15. Remove the cake on a cooling rack and allow to cool down for 10 mins.
  16. Cut the cake into slices. Happy Children’s Day. Enjoy!

20161113_001048-COLLAGE.jpg

Red Velvet Cake pops

A week more and my parents will be travelling back to India. I always aimed to give them or cook most of the items which they usually wont get readily or not intend to buy back home in India.

I had some mix of white candy melt with a little shortening left with me out of the batch I had prepared for the Princess theme birthday cake. Cream cheese frosting is what I had not tasted or tried before and I have heard that it goes well with red velvet cake. So instead of preparing usual cupcakes or cake, I planned to make cake pops. I recipe is inspired by the joy of baking video. It is a red velvet cake pop with cream cheese filling and white chocolate coated decorated with red sugar sprinklers.

img_20160928_225023


Recipe :

Ingredients :

For the cake :

  • 1/2 cup + 2 tbsp cake flour ( If cake flour is not readily available, then use 1/2 cup + 2 1/4 tsp all-purpose flour and 1 tbsp + 3/4 tsp corn flour)
  • 1/8 tsp baking powder
  • 1/8 tsp salt
  • 1/2 tbsp cocoa powder
  • 2 tbsp unsalted butter, at room temp, cut into cubes
  • 1/4 cup +2 tbsp granulated sugar
  • 1/4 tsp pure vanilla extract
  • 1/2 large beaten egg, at room temp.
  • 1/4 cup butter milk ( I used 1/4 cup whole milk, to it added 1 tsp lemon juice and allowed it to stand for 5-10 mins)
  • 2 tsp liquid Red food coloring
  • 1/4 tsp vinegar
  • 1/4 tsp baking soda

For the cream cheese frosting :

  • 1 tbsp unsalted butter, at room temp, cut into cubes
  • 1/4 cup cream cheese, at room temp
  • 1/2 -3/4 cup confectionary sugar
  • 1/4 tsp pure vanilla extract

For the white chocolate coating :

  • 1 cup white or vanilla candy melts
  • 1 -2 tsp vegetable shortening
  • red sugar sprinklers

For the cake pop assembly :

  • 12-15 lollipop sticks
  • a styrofoam or thermocol block

Method :

  1. Pre-heat oven at 350 F and grease a 6 inch round cake pan.
  2. In a bowl, sift the cake flour(all-purpose flour plus corn flour), salt, baking powder and cocoa powder.
  3. In a mixing bowl, beat the butter till smooth and creamy.
  4. To this add the sugar and vanilla extract and beat again for 2-3 minutes until light and fluffy.
  5. Add the egg and beat till well combined.
  6. Scrape the sides and bottom of the bowl at regular intervals while beating.
  7. Add the food coloring to the butter milk and whisk well.
  8. Add the flour mix in 3 parts and buttermilk mix in 2 parts, alternating each and beating at low-speed.(begin and end with the flour mix)
  9. In a small cup, combine the vinegar and baking soda and allow to fizz. Quickly fold this into the batter.
  10. Then quickly pour the mix into the greased pan and  spread the batter evenly. Tap the pan on the counter top to release any air bubbles in the batter.
  11. Bake the cake in the pre-heated oven for 25-30 mins or till a toothpick inserted in center of cake comes out clean.
  12. Allow the cake to cool completely on a wire rack and remove to carefully from the pan.
  13. In the mean while, in another clean mixing bowl, beat the cream cheese and butter on medium speed until smooth.
  14. To this add the sugar in parts and continue to beat.
  15. Lastly add the vanilla extract and beat again once till well incorporated.
  16. In a large bowl, crush the cake into small crumbs. To this add just enough frosting to hold the mixture together.(The frosting needs to be just right not little that the ball falls apart nor too much that the ball becomes soggy. i used approximately 1/4-1/2 cup of frosting)
  17. Gradually work the frosting into the crumbs.
  18. Make golf-size balls out of this mix. You should get approximately 12 balls.
  19. Place them in a tray lined with parchment paper. Place the tray in the freezer for around 15 mins.
  20. Melt the white candy melts along with the shortening in a glass bowl in microwave for 1-2 mins at intervals of 30 seconds, stirring in between. (Addition of shortening helps to give a smooth finish)
  21. Remove the balls from the freezer. Dip each lollipop stick tip into the melted chocolate and shake well to remove the excess.
  22. Then insert this stick into the ball, right in the middle, half way through. Repeat for rest of the balls. Again place them in the tray and place them in the freezer for another 15 minutes.
  23. Then coat each cake ball with melted white chocolate, by dipping and rolling into the melted chocolate. Tap while turning the stick to remove the excess chocolate. (In case, the chocolate has become dry and thick, then you can microwave it for another 30 seconds and give it a stir)
  24. Then sprinkle the red sugar on the ball rotating cake pop, while the chocolate is still melted.
  25. Pierce the cake pop stick into the styrofoam block and allow it to dry.
  26. Repeat for rest of the cake pops. Your cake pops are ready. They can be eaten right away or refrigerated for 3-4 days.


20160929_103830-collage

Eggless Blueberry Vanilla Loaf

I understand that most of my posts these days are connected to Johnson’s farm. Being a fading crop this month, blueberry picking was only for recreation purpose.We could pick very few around a cup or half a pound I guess.

So many choices were going on in my mind blueberry sauce or jam or cake or just eat them like a fruit. Finally I decided to bake an eggless blueberry cake. I apologize that I could not take any photos during the batter making process as I baked this cake in a hurry.

Recipe :

Ingredients :

  • 2 cups all-purpose flour
  • 1/4 tsp salt
  • 1 tbsp baking powder
  • 1/2 cup vegetable or canola oil
  • 1 3/4 cups granulated sugar ( you can add 2-4 tbsp more depending on how sweet you need it to be)
  • 3/4 cup milk
  • 1 cup yoghurt
  • 1 tbsp pure vanilla extract
  • 1 cup thoroughly washed and paper towel dried blueberries

Method :

  1. Pre-heat oven at 350 F.
  2. Grease and line a 9 inch loaf pan with parchment paper.
  3. Sift all-purpose flour, salt and baking powder in a bowl.
  4. In another bowl, beat sugar and oil together till it becomes fluffy.
  5. Add the vanilla extract, milk and yoghurt and beat further till you achieve a smooth consistency.
  6. In the flour mix, add the blueberries  and mix.
  7. Fold in th dry ingredient blueberry mix into the wet ingredients.
  8. Put this batter into the greased lined loaf pan and bake for around 55-60 mins or till a toothpick inserted in the center of the loaf comes out smooth.
  9. Allow it to cool for half an hour on a cooling rack.
  10. Dust some icing sugar over it and slice and serve with tea.

Millet flour (Ragi) cookies

My body structure has always been petite and I am also a weakling health wise. I had been facing joint issues few years back. I was advised by my elderly relatives to consume  finger millet flour by means of the traditional millet flour pudding made in our homes. Being fussy about food since childhood, I don’t like this pudding. However, me too am aware that ragi has many health benefits.

Few years back I had tasted ragi biscuits at my cousin’s place which she had store-bought while even one of my colleague in office had got them made to order. I just looked those cookies but failed to seek the recipe. Cookies was the only form through which I preferred consuming ragi.

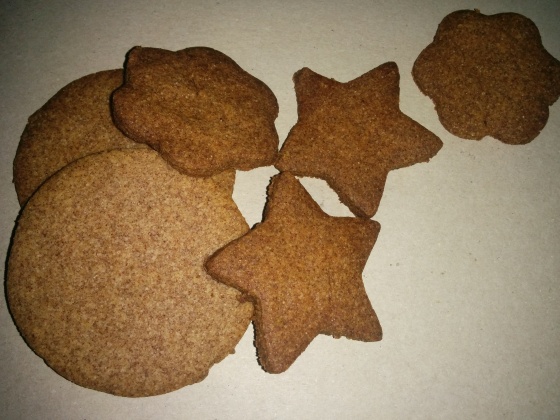
After few researches and seeking advise from some of my expert friends, here I am sharing the cookie recipe that I tried. I expect this recipe to work for most moms who want to feed ragi to their kids. Enjoy!!

IMG_20160608_105315.jpg


Recipe :

Ingredients :

  • 1/2 cup finger millet or ragi flour
  • 1/2 cup wheat flour
  • 1/2 cup butter (at room temperature)
  • 1/2 cup granulated sugar
  • 1 tsp baking powder
  • few drops of vanilla essence
  • milk as required

Method :

  1. Dry roast the millet flour and keep aside to cool.
  2. Sift the wheat flour, roasted millet flour and baking flour in a bowl.
  3. Chop the butter and add into it the sifted flour.
  4. Mix well till you get crumb like mixture.
  5. Add the vanilla essence.
  6. Sift the sugar into the above mixture.
  7. Mix well and knead into a dough using as much milk as required for binding.
  8. Refrigerate the dough for 20 mins by wrapping in a cling wrap.
  9. Pre-heat oven at 350 F.
  10. Roll the dough into thin sheet by dusting the surface with wheat flour.
  11. Using cookie cutters, cut out biscuits of desired shapes and put them in baking tray lined with parchment paper.
  12. Bake the biscuits for 10-15 mins in a preheated oven.

Note : Some mum’s don’t prefer using baking powder or soda. So here in this recipe you can avoid using baking powder completely. I was asked this question on one of the groups by a mother for her 7-12 months old kid. So to answer her query I was guided by one of my friend cum guide 🙂 that here the amount of butter is more than enough for leavening and so baking powder can be avoided.

IMG_20160608_105315-COLLAGE.jpg

Zebra cake (eggless)

My parents are here and so we were planning a long weekend getaway trip. My mum is 95% vegetarian and prefers eggless even with regards to cakes. So I decided to try something different still maintaining my family liking. So decided to explore the zebra cake.

IMG-20160630-WA0017

Recipe :

Ingredients :

  • 1 3/4 cup all purpose flour
  • 1 cup powdered sugar
  • 1 tsp baking soda
  • 1 1/3 cup milk
  • 3/4 cup vegetable oil
  • 3 tbsp cocoa powder
  • 1 tsp vinegar or lime/lemon juice

Method :

  1. Sift all purpose flour and baking soda in a bowl.
  2. In another bowl, mix milk, vinegar, sugar, oil. You can increase the amount of powdered sugar based on the sweetness you prefer.
  3. Add the dry ingredients to wet ingredients in two parts and mix well.
  4. Divide the batter into two equal halves.
  5. Sift cocoa powder in one of the batter bowls and mix well.
  6. Grease a cake tin and dust it with flour.(Remove the excess flour).
  7. Preheat oven to 350 F or 175 C.
  8. Spoon two tsbp full of plain batter in the center of the tin. Do not try to spread the batter in the tin. Straight away spoon two tbsp full of chocolate mixture on top of it. Continue doing this till all the mixture has been used. You end with lots of alternate rings in the tin.IMG_20160630_202506
  9. Bake the cake for 35 mins or till a toothpick comes out clean when pierced in the center of the cake.IMG_20160630_202506-COLLAGE